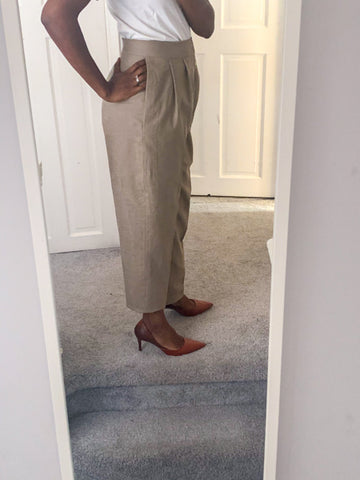
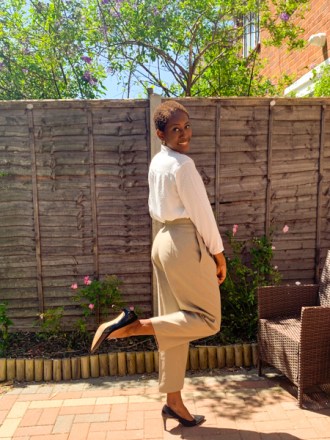
As soon as I saw this pattern, I knew I had to make the trousers. I really loved the clean lines and rounded pegged shape to the legs – and how amazing does Mimi’s white version look?
In this linen version I’ve slightly cropped the trousers and – forgive me – I haven’t got quite the right bar and hook in my stash for the waistband, so I just secured with a couple of pins in order to take these pictures on the day that I was photographing my McCall’s 7948 sundress!


The pattern
Mimi G Style / Simplicity S9114
The pattern includes three views: a gathered/tiered maxi shirt dress, a crop top designed to just about reach the waistline (based on the pattern markings!) and pleated trousers with side pockets.


In terms of difficulty, the fly front is the most complicated part of the trousers, so if you’ve made one before or are confident to try one, I think you’ll be fine. Mimi-G has a sewalong for the trousers on her You Tube channel so you may want to watch that – I didn’t use it at the time, but having now briefly skimmed through it I think it will be really helpful for anyone who’s nervous or less experienced! I might just have it on in the background for my next pair, rather than using the written instructions.
I love the shape of the legs, especially from the side. Overall this is a great and stylish pair of trousers!
The fabric

I was interested to see that linen is the first recommended fabric for the trousers. I had recently acquired this taupe linen for the #sewinlovewithlinen challenge I’m co-hosting on Instagram, and it seemed like a perfect match for this pattern!
Fabric details
100% washed linen from Rijs Textiles.
€11.99/m.
Sizing & alterations
I made a size 14 because my fullest hip measurement sits between a pattern 12 and 14 and my waist measurement sits between a pattern size 14 and 16. I was surprised to find that I still needed to take the trousers in at the waist, just before I attached the waistband. I am tempted to size down and try a 12 for my next pair, which will be in a heavy crepe and will therefore need to be a little more streamlined anyway. In all of that re-sizing, these pictures remind me that I missed a little bit of stitching at the top of the pockets, which would have made them sit a bit flatter against the body – I can see from my ‘rear view’ pictures that the pockets are gaping a bit. Not enough to stop me from wearing these trousers, though! And it’s definitely something I will get around to fixing in future.


I did like the finished length of the trousers – this is a true full length trouser. However, since the linen I’ve used really holds the structure of the more voluminous top part of the trousers, I preferred a cropped length for these trousers. The pictures below show the unaltered, hemmed length of the trouser on my left leg (on the right of the picture) and me experimenting with a shorter length on my right leg. You can also see how much ease there is throughout the leg – plenty!


What swung it for me is the elegance of the shape of the leg when the trouser is cropped – it seems to me to really exaggerate the curved profile of the leg versus the full length trousers (see the pictures below). That said, I can see myself wearing a full length version in a softer fabric.


The 4″ reduction in length meant that it wasn’t an option to use a folded-under hem, because the tapering of the trousers meant that at the shortened length, there wasn’t enough width left in what would have been the new hem allowance. If you find yourself in this situation after shortening some trousers, all is not lost! I just used bias tape to bind the hem edge. An alternative would have been to trace off a hem facing from the leg pattern pieces, but I was impatient to finish them by this point!

Instructions & drafting
The instructions were clear and comprehensive. I didn’t have any issues with construction, except that when it came to topstitching the fly, it seemed to me that the topstitching could have been closer to the edge of the fly/fly facing. I stitched mine slightly wider than indicated because I didn’t want to have wide seam allowances sitting free behind that top stitching.
I also deviated from the instructions for the waistband and used my preferred method of binding the edge of the inner waistband with a pretty bias tape, rather than folding it upwards and enclosing it within the waistband. I find that this makes the waistband less bulky – and it’s always nice to see that little flash of contrast when I pick up the trousers! (If I’d stopped to choose my bias binding before I inserted the zip, I would have gone for a black zip instead, but annoyingly I didn’t go through my bias binding box in time!)

The instructions didn’t mention applying interfacing along the side seam where the pockets would be attached, and along the hem to give a bit of body where the hem is folded. I do this out of habit now, so I did it with these trousers – although annoyingly I ended up cutting off the hem section when I decided to shorten the trousers!
Time spent
These trousers probably only took a couple of lengthy evening sewing sessions, but it felt like longer because in between those I was fiddling about with the fit and the extra details like the bias bound waistline. I also stopped halfway through making them, to allow myself time to mull over whether to shorten them, whether to add cuffs, and how much I needed to reduce the waistline by. I think the next pair will be much quicker to make, and I plan to trace off a new copy of the pattern for this cropped length, with an appropriate hem allowance.
The verdict
Another great pattern from Mimi G! I’ve made a few of her patterns now – not all of Mimi’s patterns appeal to me from the pattern cover, but the ones that do and that I have made, have definitely not disappointed. Once I get my bar and hook for the waistband I can’t wait to start wearing these trousers!

Until next time… happy sewing!


