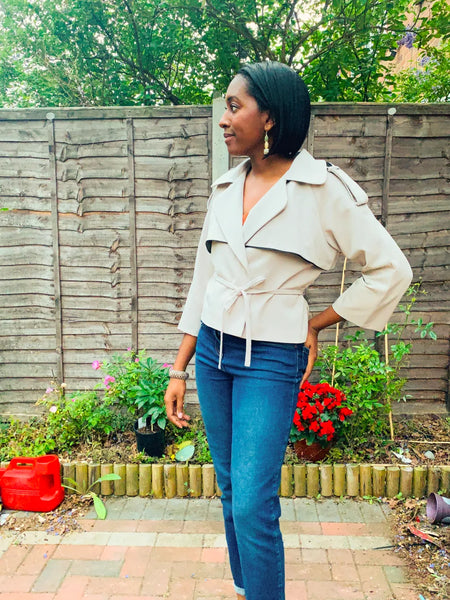
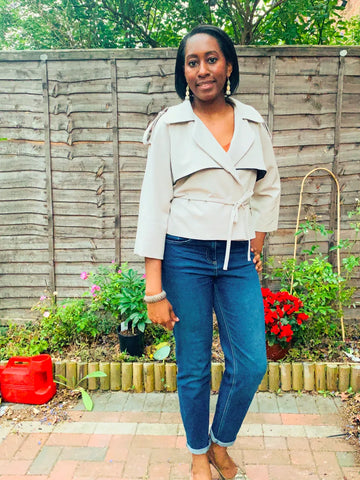
Shall we just skip the standard “wow, it has been a while since my last post!” intro? What can I say, life gets in the way … I have still been busy making, though, and now plan to catch up on my blog posts and reviews, starting with this beauty:


I made a cropped trenchcoat a couple of summers ago that I still love and use (this one). But as I mentioned in that blog post, I knew that I wanted to make another one at some point: one that was shorter, beige, and had rounded lapel/collar tips. And as I mulled it over in the back of my mind, I knew I wanted a raglan sleeved trench, too. So I’ve had that project on a list in my sketch pad for quite some time, but I didn’t feel any urgent need to follow up on it.. that is, until I saw Mimi G’s recent pattern releases. Simplicity 8890 was exactly the sort of thing I’ve been thinking about! I’m sure you can imagine it didn’t take long for me to get my hands on the pattern and start this project…
The fabric
Luckily I had suitable fabric in my stash already. I remembered that I had purchased some of the stone twill crepe fabric that Sew Over It recommended for their trenchcoat pattern a few months ago (can you tell that I have a thing for trenchcoats?). The fabric turned out to be a dream to work with. It presses really nicely and has a subtle texture that I think makes it look quite lush.
The lining fabric was one I’ve had for so long that I can’t remember where it came from or what it is. But I remember planning to use it for a beige trenchcoat, from the get go. I still have a couple of meters left since it is only used to line the cape pieces.

I used some black buttons and satin bias tape, also from my stash, and a light-to-medium weight interfacing that I think was from On Trend Fabrics.

I actually managed to shop my stash for the whole project, which is rare!
The pattern, instructions and alterations
The pattern itself was well thought out and the instructions were easy to follow. I made a straight size 10 based on my high bust measurement (33″). My waist measurement falls under pattern size 14-16, but because this is a loose jacket with generous ease, I didn’t grade up at the waist. If I had, I might have had a bit more of a “blousing” effect when tying the jacket at the waist – I’m more than happy with the fit as is, but just wanted to point out that as designed, you’d have more ease in the waist than you’ll see on my photos!

I did make one modification, which was to shorten the sleeves to three quarter length. I found that the front sleeve had some diagonal pulling/wrinkling, which was quite pronounced on the full length sleeve. I’m not sure whether I managed to cut them off grain somehow (although I was careful when laying out the pattern), whether it’s because I need an alteration for my forward/round shoulders (more likely) or whether it’s a pattern cutting issue (seems unlikely!)… In any event, I prefer the shorter sleeve for this spring/summer jacket, so I just turned up a generous hem of 5-6”. The sleeves are quite wide so I’ve still ended up with a nice shape to the shorter sleeve.
I really liked the fact that the undercollar pattern piece was cut sufficiently smaller than the upper collar to make the collar roll nicely and to ensure that the collar hides the neckline seam when worn. I thought this was well drafted, and the nice collar gave me confidence that the project was going to end well!
The only niggle I have with the instructions is that I would have appreciated some marking of the lapel roll line on the jacket front/facing pattern pieces. Had I though about it up front, I might have prepared the roll line with stay tape to help the jacket front “remember” where to fold back, but as it was I got all the way to pressing the front edge before realising I had no clue how far down the lapel was supposed to roll back. Ideally as you press the front edge of the jacket, you roll the seam to one side so that it is not visible from the front of the jacket. Above the “break” of the roll line, you would be pressing the facing edge in one direction and below the roll, you would press it in the other direction. However to do that accurately, you need to know where the lapel “ends”. In the end, I just winged it by gauging from the pattern photos/illustrations and pressed it into position, and all is well. Not a biggie, and as I say the instructions on the whole were well thought out and easy to follow. I suspect it may have been omitted on purpose because they’re not expecting people to actually press back the lapel fold, but I found it necessary to do so with my fabric.
I also deviated very slightly from the instructions in a few ways, for aesthetic reasons / personal preference:
First, I included bias tape piping between the cape and its lining, as I wanted to make that seam really stand out.
Second, I understitched the under collar by hand, using the ‘pick stitch’ stitch in contrasting black thread to continue the black details on the jacket. This had the practical benefit of being far easier to do than trying to understitch evenly and neatly by machine whilst getting all the way into the curved corners of the collar. It also means I will take every opportunity to flash that under collar like some sort of spy:


I also understitched the back neckline seam to the facing using the same method, this time in matching thread so as not to overdo it!

Third, I didn’t use the method proposed for making the belt, which was to stitch around it, leaving a gap to turn it, and then close the gap by hand once turned. It is a very long and thin belt, and if sewing is my superpower, turning thin straps/loops is my Kryponite. I hate it and rarely succeed! So I used my standard method of folding each long edge in towards the centre, like double fold bias tape, and stitching around the edge. One of these days I’m going to spend a day just practising rouleaux loops, until I’ve cracked them!
Lastly, instead of using the belt carriers for the belt, I opted to use thread chain loops for a lighter touch, visually.


Pretty insides
As this is an unlined garment, I took extra care with the insides. I used black bias binding around the facing edges but otherwise just serged them with a matching thread because the twill crepe is lighter weight than the recommended cotton types and I thought bound seams would be too heavy/bulky.

You do have to be careful when attaching the epaulettes and their carriers, as the stitching is all visible inside the sleeve!
The verdict
I’m biased, clearly, but I think this is a beautiful jacket, and one I’m proud to have made myself. That is largely because the pattern is beautifully designed and cut, and the instructions were really clear. The Simplicity team have done a great job with Mimi G’s contemporary design! I am also happy with my little finishing touches, which have put my ‘stamp’ on the finished jacket.
I would definitely recommend this pattern – get it, make it, love it!


