
This post was originally published on pearsonandpope.com
Petersham ribbon (not to be confused with Grosgrain ribbon, although it looks similar) is a strong corded ribbon with a tiny scalloped edge. It has many uses, but the one we’re going to look at is how to use it as a facing for a waist seam, so that you don’t need to use a waistband.
WHAT YOU’LL NEED:
- a garment, such as a skirt, or a pair of trousers or shorts, ready to have the waist seam finished.
- a length of Petersham ribbon, equal to the length of the waist seam to be finished (including any zip shield or zip fly edges) plus 2″/5cm.
To begin, you’ll need the garment to be made up to the point where the waist seam needs to be finished.
In this tutorial I’m using an Agnes skirt, and starting from the point where the main skirt has been sewn, the zip has been inserted, the lining has been attached at the vent, and the hems have been finished. The lining is pinned around the zip tape, ready to be hand stitched. You could complete this step first, but I was saving it since there’s a little bit of hand stitching to do after the Petersham is attached, and I prefer to do to all the hand stitching together.
HOW-TO:
- Curve your Petersham, if necessary. I’m using a pre-curved Petersham because I have a large roll of it, but for the Agnes skirt, which has a straight waistband, you could use a straight Petersham without curving it. If you have a straight Petersham and need to curve it to attach it to a garment with a curved waist seam, you just need to press the Petersham while pulling it into a curved shape, in the same way you might shape bias binding to a neckline edge before you sew it on. You could use your pattern pieces to guide you as to how curved it needs to be – try to mirror the shape of the waist seam it will be sewn to.
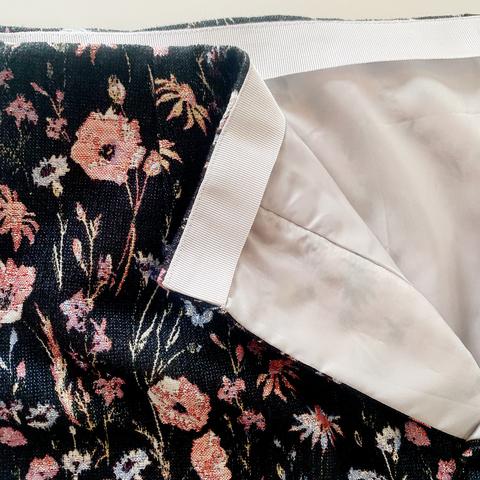
- Lay out your Petersham next to the skirt/garment as shown. You will see that the Petersham has a shorter inner curved edge (to the right of the ribbon as shown in this picture) and a longer outer curved edge. The inner curved edge of the Petersham will be sewn onto the waist seam stitching line of the garment. If you’ve attached a lining to the garment, you can use that row of stitching as a guideline, but otherwise you may want to mark the stitching line or stitch a line of basting stitches just to the inside of the pattern’s seam allowance, so that you can easily pin the Petersham over it later.
 Interestingly, the key difference between Petersham and Grosgrain is that Petersham can be pressed into a flat curve as shown in the picture above. This is what makes it great for facing curved waistlines as well as straight ones. A Grosgrain ribbon simply wouldn’t curve like this.
- Pin the inner curved edge of the Petersham to the stitching line of the waist seam of the skirt/garment at the waist, right sides up, leaving some extra Petersham hanging at each end of the waist seam. The inner edge of the Petersham should sit just below the stitching line of the waist seam. At the edges of the skirt, fold the Petersham under itself as shown on one edge in the images below, trimming the folded-under piece as necessary. You only need a short underlap of say 1/2″ (1.2 cm).


- Stitch all around the Petersham to secure it to the garment, stitching as close to the edge of the Petersham as you are able to. Then turn it to the inside, and press. Hand-stitch the folded ends to the zip tape, and use a few hand stitches to tack the Petersham to the inside of the garment in a couple of places, such as at the side seam allowances of the skirt. Apart from at those points, the Petersham should hang free inside the skirt.

And there you have it, a clean finished waistline with a light-yet-supportive facing!

2 comments
Thank you excellent explanation as to how to sew petersham waistband to a lined skirt, straight to the point easy to understand.
>Pin the inner curved edge of the Petersham to the stitching line of the waist seam of the skirt/garment at the waist, * right sides up *
I don’t know what “right sides up” means. Don’t you mean “right sides together” for sewing the petersham to the skirt top? Then, when flipping the petersham over and pressing after sewing, the petersham right side will be the facing on the inside of the skirt, and the petersham wrong side will be against the wrong side of the skirt fabric, just as one would do with a regular sewn-on waistband.